Saturday, October 7, 2017

Star Wars Episode VII 12 inch Rey - Jakku

Just from sheer luck/fate/serendipity, I happened across the last 12 inch "Not Titans" Force Awakens Rey at my nearest Toys R' Us, after being 'gone' from the shelves for well over a year. Full price still, but cheaper than ordering online and waiting.

INITIAL FIGURE


Once again, a remarkable amount of work went into this mold. They didn't get stingy with details on her arm-wrap sleeves. Trust me when I say your average Marvel Titans comes nowhere near this level of intricacy. Like Cassian, you can tell right away that this is Daisy Ridley but cartoon-ized.

DISASSEMBLY AND PRIMING


Unfortunately, like all budget toys, QA won't catch everything. On the hair you can see the remnant of the tab where this head piece was once connected to the sprue. Took no time at all to X-Acto it off though. Same was found on her staff.


So this is after I dipped the face in dark chocolate. Kidding, this is after wiping the face away with acetone.

This picture takes some explaining. Her staff was coated in a completely different primer (Rust-Oleum Sandable Gray), while her whole head was primed with Krylon White.

Now you can see that the arms are also primed, but not the rest of the body. The reason for this is everything primed are parts that are made of PVC. If you didn't see my Cassian custom, I learned that raw/exposed PVC does NOT hold on to finisher at all. This time I needed all of that coated by something. Fortunately, I intended to repaint her arms and hands skin color anyway, so it all worked out.

BASE COLOR


This is with the new base colors laid down. I added the missing grey-brown for the pants; put down Antique White for the sleeves and shirt; and then added the olive green to the strap and boot soles. Unfortunately I think I made it a little too green, but fortunately the shoe polish phase helped re-adjust back to an olive-brown. I jumped the gun here as you can see I already added shadow to her back and arms. This proved to be a mistake as you'll see in a bit.


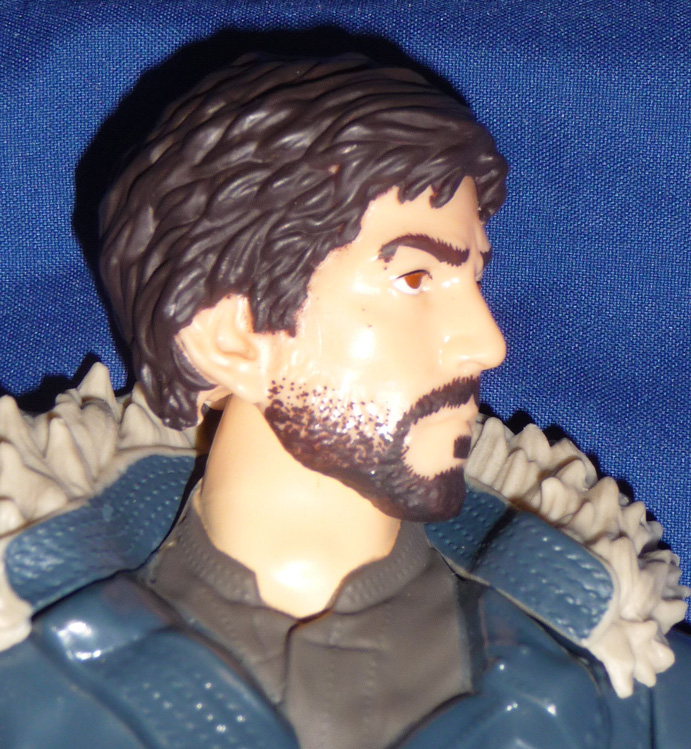
This is the head with a fresh coat of brown and flesh.

SHADOWING AND HIGHLIGHTS


This is after my initial sweep of the ol' Shoe Polish Trick. Now unfortunately, it did not lay down AT ALL like I expected; a lot of my paint as well as the original paint absorbed much more shoe polish than the other two figures. The only place it really worked was the sand brown body shawl-thinger. Everything else had to be corrected or repainted. The pants were especially disastrous.


So opting out of the Shoe Polish for the hair, I did a much more traditional wet wash of very very dark brown for the hair.


For the staff I've already done a dry brush of FolkArt Gunmetal and did a good Brown shoe polish rub all over the strap and handle.


Here you can see my 'patented' blush wash. Unfortunately the primer came down weirdly uneven on her left side so this face is very 'au naturale' on certain angles.

I did a much more subtle dry brush of FolkArt Metallic Bronze on the hair for that nice glinting effect. Daisy Ridley's hair definitely had no highlights during the film, so I had to make it accurate.

FLESHTONES AND FACE

I was extremely lucky to have run into this particular bottle of Anita's Craft Paint in Pumpkin orange for dirt cheap at a second hand store (despite being super cheap to begin with). A solid wash of Pumpkin/Flesh mix set in this subtle tan that Daisy Ridley has in all of her Jakku scenes.


Here's the face with said Pumpkin wash. This really interesting freckle/blemish effect came out. Definitely sells became a face that's been sun-beaten by trotting the desert for endless days.


Base color for the flesh and lips. I went way easier on the red here as my mixture for Cassian was definitely too pink, even for a blood-filled human being.

I think I finally found the right technique for eyebrows, as it definitely looks like a mess of hair here instead of a solid block of color.


The eyes for the white as well as some error corrections on the lips.

Now here's where I learned a new lesson about metallic paints: they don't blend exactly the way you expect. Daisy Ridley has hazel eyes, almost this weird pearlescent not green/not gold color. Now I initially figured that I can use Metallic Emerald as a base, then wash over that with a Metallic Antique Gold. Now before the dots of the eyes came down, it didn't look too bad. But as soon as those came down, the read of the irises went completely out the window. From far away and even in these pictures she looks ridiculously bug-eyed, as if Rey just got back from a cornea exam. But you can still make out the emerald green, but not enough to register as part of the irises.

Unfortunately this step is basically irreversible, as trying to erase black from white will still yield an unpleasant 'grey' presence in the eyes, forcing me to start over. BUT, starting over means redo-ing the pink wash and eyelashes which already looked good and so not worth redo-ing. So I left it there as a reminder of what to do next.

Also, this time, I did a highlight pass on the lips instead of the dark wash. Much more accurate this time around. However, I'll most likely use the dark wash again depending on the movie star.

DIRT AND WEAR


To represent the abundance of Jakku sand, I used a much browner color than I did for Cassian and Jyn, as Jakku and Jedha are not the same place (wink wink). A good dry brush all around, except this time I didn't go crazy on the boots. Jakku sand is apparently looser as in all of the screengrabs I can find there isn't actually that much sand sticking to her boots.
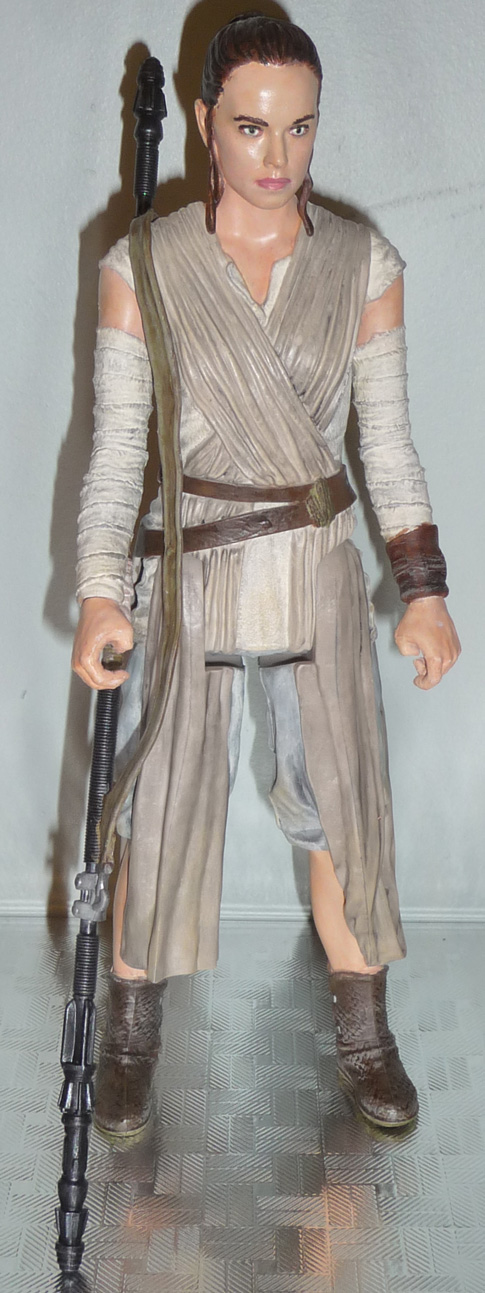
COMPLETED FIGURE


Honestly, not my best work out of the three so far, as I made mistakes that were very difficult to undo and involved more repaints than I have time for. With that said it still looks freakin' good.

I also learned a new lesson: do NOT use clogged aerosol cans. Her head came out to a perfect matte finish because I switched cans at that point. A brand new aerosol can behaves completely differently from a clogged/old one. Yes, you figured something so obvious would've hit me back when I did Jyn Erso, but nope.


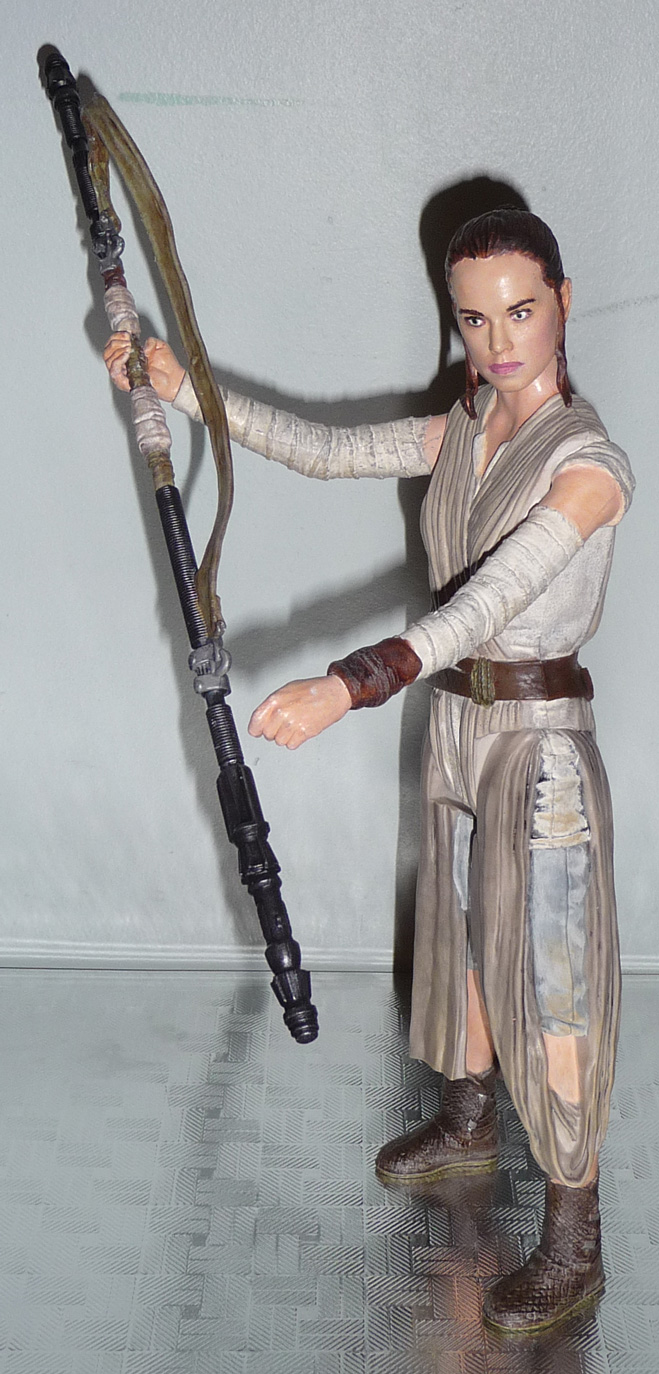
More close ups of the staff and face.


Group shots with Cassian and Jyn. Too bad this team-up can't happen in the official timeline.
 

BEFORE AND AFTER

Despite being the weakest entry yet, it's still leaps and bounds in detail from its original state. It's actually kinda funny how both still look bug-eyed, but in different ways.

Of course, you can't have Rey without Finn, so he's up next, Star Wars-wise anyway. I'll likely put him on the back burner as he isn't very challenging. Plus I'm in love with the Justice League figures' posability, so I really want to see what they look like "as they really should" in much more dynamic poses than I can pull off with these Hasbro figures. Until next time!
-A.K.

Tuesday, September 26, 2017

Rogue One: A Star Wars Story's Cassian Andor

 Since I couldn't leave just Jyn to get those Death Star plans by herself, I went ahead an picked up the matching Cassian Andor from the same figure line. This Cassian is in his initial Jedha/Eadu appearance with blue parka and puffy pants. 

INITIAL FIGURE

Right away his face deco is an improvement from the Jyn figure, as this head looks much closer to Diego Luna in appearance. Still, it's basically the "cartoon" version of his face, and leaves a lot to be desired.

DISASSEMBLY AND PRIMING


I acetone-d off his face deco but kept the hair. Since I wasn't expecting to do minute detailing for the hair I didn't mind having a slighty thicker layer there. The more paint for the primer to hold on to the better.

I unintentionally de-glued the much softer fur collar around his neck while I was trying to pop the head off with hot air. This turned out to be a good thing it would've made it much trickier and laborious to try and not paint the neck fur while detailing the blue jacket.

Since Cassian's head isn't terribly large, I went ahead and did a single coat of white primer over the whole thing, leaving just a tinge of the original coloring underneath. This step turned out to be extremely important as I will explain when I get to matte finishing this thing. I also primed his Blaster in an effort to not repeat the same mistakes from Jyn's Blaster (ironically running into a whole new problem, also related to the matte finishing.)

BASE COLORS AND DETAILS

Fortunately, this figure wasn't missing too much from his original design. I added silver to his belt buckle, pocket grenades(?) and wrist communicator. I'm glad they only showed part of his sleeve buttons as in his outfit it's a whole mess of colors. I already added some brown shoe polish staining to his pants and boots at this stage.

SHADOWING AND HIGHLIGHTS


 I added the shadowing effect here with Cosplay Chris' patented shoe polish technique. A good coating of Kiwi Scuff Cover then rubbed away with cheap napkins. You can already see how much detail came into view after this application. I especially love how the gloves came out; very gritty and seen some better days.


The shoe polish trick did however leave the parka far darker than it ever appeared on screen, so to 'return' the color, I used Americana brand True Blue and did a pass of 'semi-dry' brushing, focusing on the raised and broad areas of the parka. It did a good job of bringing life back into the hue.

DIRT AND WEAR


Same with Jyn, I dry-brushed a yellow-brown all over this thing, with focus on boots and elbows. Definitely looked like this guy's been walking across a desert.

FUR AND HAIR

For Cassian's hair I did a pass of a darker brown and painted in the grooves. The fur collar was a bit trickier as in the movie, it's very much wolf/husky fur in appearance: going from a lighter color internally to a darker color as it goes out. A layer of brown shoe polish then that same darker brown on the hair was dry brushed onto the fur tips. Not perfectly looking, but the detail in the fur looks so much more obvious now.

Also, at this stage I added the 'blush' wash to Cassian's face, except a good hint darker than Jyn's. I particularly love what this wash did for the ears as they look eerily real after this step.

FACE DETAIL


Here I laid down the flesh pink on the eyes and lips, then threw on the gloss white eyeballs.

 Using that same darker brown from before, I did light strokes for the eyebrows and beard, with dry brushing on the stubble. I probably came down a little too heavy on the eyebrows, but the shape was dead on. For his irises I used FolkArt Metallic Inca Gold. I kept the 'slightly to the left' gaze the original deco had as Diego Luna looks in that direction in all of his promo shots.

 For his hair shine I used FolkArt Metallic Bronze and dry brushed quite liberally.

FINISHING TOUCHES

I didn't get it on photo, but I did add the same lip gap wash, except this time adding a light coat afterwards; you can see his lips are a little too 'hot pink' before this step.


 This is after a basic coat of Krylon Matte finisher. Now here's where I ran into some issues, old and new:
  • His fur collar is a very soft rubbery +plastic, highly plasticized PVC I believe. It did not hold onto this finisher AT ALL. But because the finisher is Acetone based, it pretty much melted any 'raw' paint it touched. So as you'll see it's still in this extremely glossy state that, unfortunately, took a small chunk of hair paint with it right after I took these pictures.
  •  As mentioned earlier, a similar quirk ate the paint on his Blaster's grip. His fists are also PVC; they didn't get too glossy, but definitely kept the finisher 'free', completely melting the acrylic off that grip and revealing the white primer underneath.
So new rule from now on: ALL PVC parts need to be primed. No exception. His head is also PVC but did not suffer the same overgloss/leaching effect, so I'm gonna stick with this rule from here on out.

COMPLETED FIGURE


So here is Cassian Andor in his mostly-painted glory. I think it looks pretty darn good. Very happy with how the face came out, and I'm also happy that I did the highlight work on the parka, as that would've looked REALLY drab without it. I didn't bother gluing back on the parka fur collar since I didn't want them to do anymore damage to the hair (thankfully really hard to see from these pictures). I might not ever actually glue it back, as it takes no work to make it snug for display/picture purposes.

 Here are Cassian and Jyn side by side, cautiously tracking Saw Gerrera's henchmen. And yes, Jyn is holding that Blaster all wrong; I didn't want to damage the black paint on it anymore than I already have so I kept the grip loose. Although I think I will just go ahead and use my enamel paint markers on both of their Blasters.

BEFORE AND AFTER

And lastly, here are the before and after shots of this figure. Again, they put in a considerable amount of work into this mold but gets sidelined as 'kids toys' because of lack of paint. I didn't even know he had those sleeve buttons until I had to look them up from screengrabs.

Can't say enough how happy I am with the turnout of the face; from far away enough it just looks dead on Diego Luna. Obviously there's no way I can expect Hot Toys level of detail but for such an inexpensive figure there was a lot of realism that was just simply hidden by lame tampography.

I have more Star Wars coming down the pipe, as well as some tasty Justice League figures just begging to be repainted. Until next time!
-A.K.